
Build a settings panel
This example adds Personal appearance to extension settings. A color input and a larger-controls checkbox call a Save action, which writes only this extension's preferences. It demonstrates a panel, theme integration, a host action and scoped storage. It changes the example panel's settings.
Platform: custom web panels are a Windows preview. Linux and mobile custom panels are unavailable. The public source is implemented; the complete signed installation and consent flow remains a Preview requirement.
Download the complete panel and menu project, including source, manifest, build settings and handler tests. This is source code to build yourself, not a signed installable package.
Create the project
glxdev new --kind reference --reference accessible-theme --language typescript --package-id org.example.workspace-panel --name "Workspace panel" --publisher org.example --output ./workspace-panel
cd workspace-panel
glxdev doctor
The CLI supplies the complete HTML, manifest, guest entry point, and storage handler. C#, Go and Rust action projects are in the same reference directory.
Describe the panel and its action
The complete panel manifest declares:
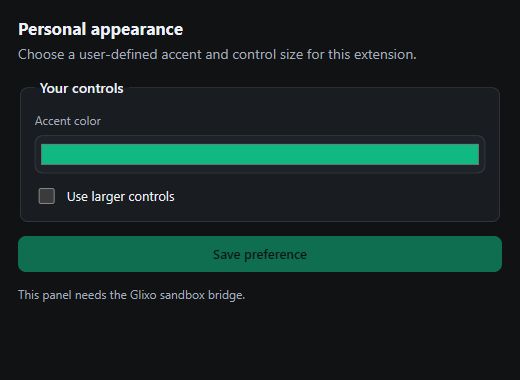
panel-ui:sandboxed-web, with entry fileui/index.html.panel-actions:wasm-component, implementing the action interface.- Surface
themed-custom-panelatsettings.extensions, allowingsave-preferences. - Action
save-preferences, acceptingaccentandlargeControlsand returning{ "accepted": true }. - Permissions scoped to the surface, the Save action and
accessible-theme/preferences/storage.
ui/index.html runs in an isolated frame. Its bridge is window.glixoExtension; arbitrary browser windows do not have this bridge. The real sample calls:
const host = window.glixoExtension;
const result = await host.invoke('save-preferences', {
  accent: document.querySelector('glixo-user-custom-control').value,
  largeControls: document.querySelector('#large-controls').checked,
});
Keep the full sample's readiness checks and error handling. It waits for the host theme event and host.ready() before enabling Save, listens for glixo-theme changes, and sets the document language on glixo-locale. Apply the supplied colors and font tokens so your panel follows light/dark mode. Use labelled controls, visible focus and a live status message.
Implement the Save handler
The guest receives an action envelope with kind, contributionId, input and host context. The handler source validates the action ID, session context and both input fields before writing:
state.set('accessible-theme/preferences/current', JSON.stringify({
  accent: accent.toLowerCase(),
  largeControls,
}));
return { accepted: true };
The guest entry point connects this logical state API to Glixo's stateSet broker. Never use a browser localStorage record as a replacement for host-approved extension storage. The host validates action parameters and permissions independently of the frame.
Update UI assets and digests
If you edit ui/index.html, update its digest in both the panel-ui component and the declared surface asset. Create scripts/update-ui-digest.mjs in your project:
import { readFileSync, writeFileSync } from 'node:fs';
import { createHash } from 'node:crypto';
const file = 'glixo.extension.json';
const manifest = JSON.parse(readFileSync(file, 'utf8'));
const digest = 'sha256:' + createHash('sha256')
  .update(readFileSync('ui/index.html')).digest('hex');
for (const component of manifest.components ?? []) {
  if (component.artifact === 'ui/index.html') component.digest = digest;
}
for (const surface of manifest.contributions.surfaces ?? []) {
  for (const asset of surface.assets ?? []) {
    if (asset.path === 'ui/index.html') asset.digest = digest;
  }
}
writeFileSync(file, JSON.stringify(manifest, null, 2) + '\n');
Run node scripts/update-ui-digest.mjs after UI edits. Declare and hash every additional script, style or image you ship. No private app rebuild is required.
Build and package the panel
glxdev check
npm ci --install-links
npm run build
npm test
glxdev pack
glxdev verify --output ./dist/package
The tests cover the Save handler and invalid inputs. The ZIP must contain ui/index.html, the action component and the signed declarations. Follow signing and installation; glxdev test's provider fixture runner does not test web panels.
Test the panel in Glixo
- Install the package under the account you use in Glixo.
- Open Details, approve the panel, action and storage permissions, and select Start.
- Open Settings > Personal appearance. Select an accent and toggle larger controls, then Save.
- Check that the action completes. Switch Glixo's theme and confirm the panel follows it.
- Reopen the panel and restart the extension. The example persists the preference through its handler; its current HTML does not load that saved preference back into the controls. Implement a separately declared read action if your product needs a restored form.
- Remove the action/storage permission and confirm saving fails with a readable status.
The sample stores preferences but does not implement a Glixo-wide theme selector. Its Save status uses the bridge's completion response; the action result itself is { "accepted": true }. Do not confuse a stored value with a complete appearance editor.
Open in the main panel
To request an extension panel at code.main-panel, change the surface's placements and matching ui.surface permission scope together. Change the action placement as well when the action belongs there. Keep the component and asset declarations. Validate and package the modified project to a fresh output directory. The app supplies the panel frame and navigation; the extension supplies only its content. Platform Preview limits still apply.
Add a context menu action
Continue with Reset panel preferences from a context menu. It adds a second action to this project and uses the same scoped storage, with a complete guest implementation you can copy.